From ASSP, managers can post shifts to the Schedule Pool on behalf of other employees, as well as approve requests to post, pickup, and exchange shifts.
Posting a Shift on Behalf of an Employee
From the Schedule Pool, a manager can post a scheduled shift on behalf of an employee.
Select the
Available Shiftstab on theSchedule Pool.Select the employee.

When the selected employee is changed, the schedule calendar of the
Schedule
Pool
will change to that employee’s schedule. From the calendar, you can select shifts to post.
Select at least one shift to post.

Press Post to open the post dialog.
From here the shift details can be reviewed, additional options for the posting can be entered, and comments can be added.
When the posting is ready to submit press Post to post the shift to the schedule pool.
Once a posting has been made for a shift, it may still need to be approved before it becomes available for pickup or exchange. This will depend on how the Schedule Pooling Rules are set up for the Work Group of the employee. |
Posting Options
The following options are available to managers when creating a new posting:
- Pickup/Exchange Pay Code
Enter a
Pay Codethat will override the shift pay code when the shift is picked-up or exchanged. When noPay Codeis entered, the existing Pay Code of the posted shit will be used.- Available for Pickup/Exchange until … Hours before schedule time
Enter the number of hours before the shift starts that the posting will be available in the schedule pool. If you want the posting to be available in the schedule pool up until the shifts starts, enter 0. Once the time until the shifts starts is less than the number of hours entered the posting will automatically expire and no longer be available for pickup or exchange.
- Posting should remain available … Hours after posted
Enter the number of hours that the posting will remain in the schedule pool before a pending pickup or exchange request for the posting should be approved by a manager. The number of hours is measured from the time that the posting is created (not the time the posting is approved).
- Require shifts to be Picked-up/Exchanged together
Select this option to bundle multiple shifts as a single posting that must be picked-up or exchanged together.
Requests on Employee’s Behalf
From the Schedule Pool a manager can see their employee’s schedules and see whats shifts are available for their employees to pickup or exchange. Manager’s can make pickup and exchange requests on their behalf.
| Requests made by manager’s on an employee’s behalf will appear as if made by the employee to other employee’s and managers. |
Requesting a Pickup on Behalf of an Employee
To make a pickup request on behalf of an employee:
Select the
Available Shiftstab of theSchedule Pool.Select the employee to make a pickup request for.
The shifts that the currently selected employee are eligible to pickup or exchange will be listed below.
Select at least one shift to pick up.

Press Pick Up to open the Pickup Request dialog.
You can review the details of the shift to pickup and enter any additional comments at this point.
If there are any conflicts in the employee’s schedule with the shift being picked-up it will be displayed under the
Conflictscolumn

When you are ready to send the pickup request press Submit.
| The pickup request will need to be approved by a manager before the request is finalized. This is required even when a manager makes a pickup request on an employee’s behalf. |
Requesting an Exchange on Behalf of an Employee
To make an exchange request on behalf of an employee:
Select the
Available Shiftstab of theSchedule Pool.Select the employee to make an exchange request for.
The shifts that the currently selected employee are eligible to pickup or exchange will be listed below.
Select at least one shift to exchange.

Press Exchange to open the
Shifts to Exchangetab of the Exchange Request dialog.You can review the details of the shift to pickup and enter any additional comments at this point.
If there are any conflicts in the employee’s schedule with the shift being picked-up it will be displayed under the
Conflictscolumn

Press Next to move to the
Exchange with Shifttab.
1 Here you can change the range of dates of the schedule to select for exchange. 2 If the other employee has any conflicts for the shift listed, the conflict will be displayed under the Conflictscolumn next to that shift.3 Any comments that you want the other employee to see can be entered here. Select one or more shifts to offer in the exchange.
When you are ready to send the exchange request, press Submit.
| The exchange request will need to be approved by a manager before the request is finalized. This is required even when a manager makes an exchange request on an employee’s behalf. |
Approving an Employee Posting
Once a posting has been made by an employee, it may need to be approved before it becomes available in the schedule pool for pick up or exchange. Postings that are pending manager approval will appear in the Pending Requests tab on Schedule Pool.
Managers will only need to approve of posting requests if the
|
To approve a pending post, do the following:
Select the
Pending Requeststab on theSchedule Pool.Select
Post Requestsfrom the drop-down.
This will filter the displayed requests to show only posting requests.
Select at least one request with a
Pending Approvalstatus.
Press Approve to open the approval dialog.
From here you can review and edit the details of the posting before approving it.When the posting is ready to approve press
Approveto approve of the posting.
This will enter the posting into the pool so that other employees can submit pick up or exchange requests for the posting.
Approving an Employee Request
When a posting is approved and entered into the pool, other employees can request the shift for pick up or exchange. When one of these requests is made, a manager will need to review the request and approve it before the shift is picked up or exchanged.
| Pickup and exchange requests will always require manager approval. |
Approving Pickup Requests
When a manager approves a pickup request, the employee picking up the shift will have the picked-up shift added to their work schedule automatically. Managers do not need to immediately approve pickup requests if the original posting has not yet expired, as they want to give more time for other employees to make pickup requests for the shift.
To approve a pending pickup requests:
Select the
Pending Requeststab on theSchedule Pool.Select
Pickup Requestsfrom the drop-down.
This will filter the displayed requests to show only pickup requests.
Select a pickup request to approve.

Press Approve to open the approval dialog.
At any time before finalizing the pickup, the tabs at the top can be used to return to a previous step.

From the
Shifts to assigntab you can review the details of the shift being picked-up.
Press Next to move to the
Assign to employeetab of the dialog.
From here, you can review the details of the employee who is picking up the shift.Press Next to move to the
Confirmationtab of the dialog.
From here you can make adjustments to the shift before it is added to the employee’s schedule.
The top section will adjust the details of the shift that is picked up and the bottom will adjust the details of the original shift that was posted. When the pickup is ready to finalize press Assign.
This will add the picked-up shift to the employee’s schedule and update any details of the shift accordingly. Any other requests for the same shift will automatically be canceled.
Approving Exchange Requests
Employees have the option to exchange one of their schedule shifts with one in the pool. When a request is made to exchange a shift with one in the pool, the employee who posted the shift to the pool will be notified of the request. This employee will be able to review the offered shift and can choose to accept or reject the offer.
The exchange offer and corresponding employee review process happen without any manager intervention. However, a manager can approve of a pending exchange request without waiting for the employee’s acceptance.
| An employee might receive multiple offers from different employees, so this process allows them to accept the offer that works best for them. |
Once the two employees have agreed on an exchange, a manager must approve of the final exchange before it is completed.
Managers can approve of pending exchange requests as follows:
Select the
Pending Requeststab on theSchedule Pool.Select
Exchange Requestsfrom the drop-down.
This will filter the displayed requests to show only exchange requests.
Select an exchange request to approve.

The status of pending exchange requests will change depending on if the employee who made the posting has agreed to the exchange or not.

The
Pending Acceptancestatus indicates that the employee has not accepted the exchange offer.

When both employees have agreed to the exchange the status will change to
Employee Acceptedand will need to be approved by a manager before being finalized.
Press Approve to open the approval dialog.
At any time before finalizing the exchange, the tabs at the top can be used to return to a previous step.

From the
Shifts to exchangetab you can review the details of shift in the schedule pool being exchange for.If there are any problems with the exchange they will be displayed under the
Conflictscolumn.

Press Next to move to the
Exchange with Shifttab where you can review the details of the shift offered in exchange.If there are any problems with the exchange for the other employee they will be displayed under the Conflicts column.

Press Next to move to the
Confirmationtab.
From here you can make adjustments to the shifts before they are exchanged between the employees.
When the exchange is ready to approve, press Exchange Shifts to finalize the exchange.
This will add the exchanged shifts to each employee’s schedule and update any details of the shift accordingly. Any other requests for the same shift will automatically be canceled.
Exchange Request Confirmation tab
The Confirmation tab of the exchange approval dialog allows you to enter overrides for some of the codes attached to the shifts when they are exchanged. Any of the fields that are left blank will use the existing values from the shifts that are exchanged.
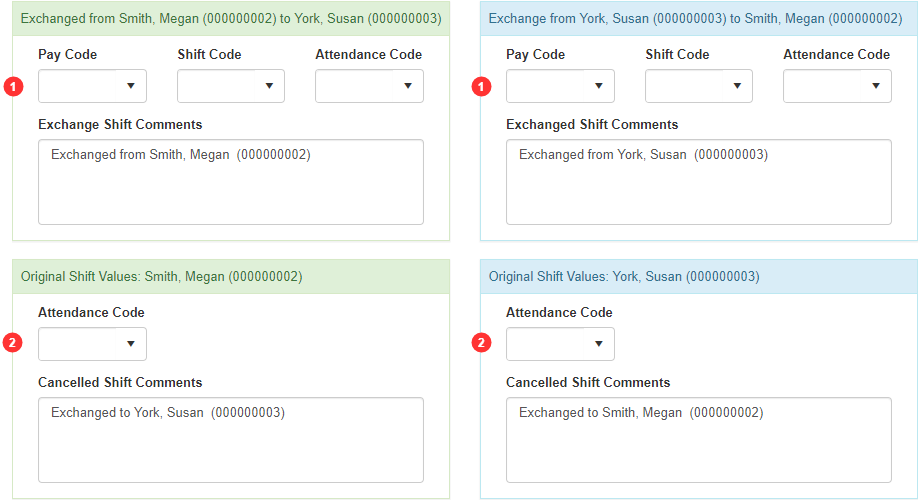
| 1 | The Exchanged from section allows you to enter overrides for the Pay Code, Shift Code, and Attendance Code for the employee who will work the exchanged shift. |
| 2 | The Original Shift Values section allows you to enter an Attendance Code override for the original shift. |
Sorting employees in Pickup & Exchange Requests
There may be many employees requesting to work a posted shift. To help select the right employee, you can change the employee information displayed and the employee's order.
To change the sort order:
Select the
Pending Requeststab on theSchedule Pool.Select a pickup or exchange request to approve.
Select the
Pickup by employeetab, then select Post.In the Sort column, select A-Z or Z-A for the information you'd like to sort employees on.
A-Z sorts dates from oldest to newest and numbers in ascending order. Z-A sorts dates from latest to oldest and numbers in descending order. In the Visible Column:
Select the information you’d like to display, so there's a checkmark beside it.
Deselect the information you don’t want to display, so there’s no checkmark.
Drag and drop each field until they’re in the correct order.
The order of the fields determines: - How the information display on the employee selection screen.
- The sort order if you’re sorting by multiple values.
If your sorting by multiple values, be sure that the information you’d like to sort by first is displayed in the list first.
In this example, if two employees have the same Seniority Date, the employee with more LTD hours displays nextSelect OK to save your changes.
Rejecting or Canceling Pending Employee Requests
Posting, pickup, and exchange requests that are pending manager approval can be rejected or canceled by a manager. The difference between rejecting and canceling a request is that a rejected request cannot be made again, but a canceled one can.
Rejected postings cannot be posted again by the employee or manager who posted them. This will prevent them from posting any of the shifts contained in the rejected posting again.
Canceled posting can be posted again by employees and managers.
Rejected pickup and exchange requests cannot be made again by employee or manager who requested them. This will prevent them from making subsequent requests for the same posting.
Canceled pickup and exchange requests can be made again by employees and managers.
To reject or cancel a pending request, do the following:
Select the
Pending Requeststab on theSchedule Pool.Select at least one pending request.

Press Reject to reject all shifts that are currently selected, or press Cancel to cancel them.
A confirmation dialog will display the requests that are currently selected for cancellation/rejection.

Press Yes to cancel/reject the requests.